IOT 기기 분석 - 펌웨어 다운로드 방법
| "본 블로그의 모든 정보는 합법적이고 윤리적인 보안 연구와 교육 목적으로만 사용되어야 합니다. 불법적인 해킹 및 악의적인 활동에 사용될 경우, 그 책임은 전적으로 사용자에게 있습니다." |
펌웨어(Firmware) 다운로드 방법
□ 개요
펌웨어(Firmware)를 다운로드는 방법을 알아보고 분석해보자
※ 펌웨어는 컴퓨팅과 공학 분야에서 특정 하드웨어 장치(read-only memory, ROM)에 포함된 소프트웨어로, 소프트웨어를 읽어 실행하거나, 수정하는 것도 가능한 영구적 소프트웨어(permanant software)를 뜻한다.
□ Bootloader debug mode 에서 메모리를 읽어들여 펌웨어 덤프
- UART 확인 후 Shikra를 연결한다 (GNR, TX, RX 연결)
- TX, RX 잘못연결이 디스플레이가 되지않거나, 명령어 입력이 되지않음.
※ TX, RX는 Logic Analyzer 를 통해 확인


□ 부트로더가 쉘을 지원하는 경우
1. 시스템에 정의된 특정단어 입력시 쉘 진입
2. md(memory dispaly) 부분을 확인한다
3. 장비별 쉘 진입모드 히든키를 입력한다
4. 부팅시 디스플레이되는 펌웨어 메모리 주소위치를 확인한다
5. 메모리 덤프 명령어를 이용하여 메모리 확인 (펌웨어 이미지 시작점)
- iptime / xdiag : 80500000 10000
- kt mini / esc : db 0x80003770 100

6. 커맨드 모드에서 분석완료후 기존모드로 돌아가려면 장비 RST 해야 함.

□ iptime N1+ 장비 부팅 Full 메시지
| Booting... @@@@@@@@@@@@@@@@@@@@@@@@@@@@@@@@@@@@@@@@@@@@@@@@@@@@@@@@@@@@@@@@@@@@@@@@@@@@@@@@ @ @ chip__no chip__id mfr___id dev___id cap___id size_sft dev_size chipSize @ 0000000h 0ef4015h 00000efh 0000040h 0000015h 0000000h 0000015h 0200000h @ blk_size blk__cnt sec_size sec__cnt pageSize page_cnt chip_clk chipName @ 0010000h 0000020h 0001000h 0000200h 0000100h 0000010h 000004eh W25Q16 @ @@@@@@@@@@@@@@@@@@@@@@@@@@@@@@@@@@@@@@@@@@@@@@@@@@@@@@@@@@@@@@@@@@@@@@@@@@@@@@@@ ---RealTek(RTL8196E)at 2012.07.06-04:36+0900 v0.4 [16bit](380MHz) Delay 1 second till reset button GPIO CONTROL: ffffff9f GPIO DIRECTION: ff000040 Wait 3 secs ..... ------------ Factory Default ------------ .Magic Number: ▒▒▒▒nv 00000001 Check Firmware(05020000) : size: 0x001d4fc8 ---->[ OK ] Jump to image start=0x80500000... decompressing kernel: Uncompressing Linux... done, booting the kernel. done decompressing kernel. early printk enabled Determined physical RAM map: memory: 01000000 @ 00000000 (usable) On node 0 totalpages: 4096 zone(0): 4096 pages. zone(1): 0 pages. zone(2): 0 pages. Kernel command line: root=/dev/mtdblock1 console=0 single Calibrating delay loop... 379.28 BogoMIPS Memory: 9500k/16384k available (2310k kernel code, 6884k reserved, 416k data, 60k init, 0k highmem) Dentry-cache hash table entries: 2048 (order: 2, 16384 bytes) Inode-cache hash table entries: 1024 (order: 1, 8192 bytes) Mount-cache hash table entries: 512 (order: 0, 4096 bytes) Buffer-cache hash table entries: 1024 (order: 0, 4096 bytes) Page-cache hash table entries: 4096 (order: 2, 16384 bytes) check_wait... unavailable. POSIX conformance testing by UNIFIX Linux NET4.0 for Linux 2.4 Based upon Swansea University Computer Society NET3.039 Initializing RT netlink socket Starting kswapd Serial driver version 6.02 (2003-03-12) with no serial options enabled ttyS00 at 0x2000 (irq = 5) is a rtl_uart1 state->flags=00000000 Realtek GPIO Driver for Flash Reload Default Init IPTIME GPIO: block: 64 slots per queue, batch=16 PPP generic driver version 2.4.1 MPPE/MPPC encryption/compression module registered SPI INIT flash device: 0x200000 at 0xbd000000 probe realtek capacity_id 15 get SPI CS0 maker:ef type:40 sector_cnt:32 get SPI chip driver! Physically mapped flash: Found an alies 0x200000 for the chip at 0x0, winbond device detect. probe ends probe realtek2 Creating 2 MTD partitions on "Physically mapped flash": 0x00000000-0x00200000 : "boot+cfg+linux+rootfs" 0x000d0000-0x00200000 : "root fs" RealTek E-Flash System Driver. (C) 2002 RealTek Corp. Cannot find driver for DiskOnChip Millennium at 0x6000 Realtek WLAN driver - version 1.6 (2013-02-21) wlan_index:0 0, 134,0xb9000000,0xb8b10000,21 =====>>INSIDE rtl8192cd_init_one <<===== PCIE reset (0) Do MDIO_RESET 98 - 25MHz Clock Source Find Port=0 Device:Vender ID=817910ec vendor_deivce_id=817910ec =====>>EXIT rtl8192cd_init_one <<===== <rtl8192cd_init_one>LZQ: after read tmpReg[0xbf] =====>>INSIDE rtl8192cd_init_one <<===== =====>>EXIT rtl8192cd_init_one <<===== <rtl8192cd_init_one>LZQ: after read tmpReg[0xbf] =====>>INSIDE rtl8192cd_init_one <<===== =====>>EXIT rtl8192cd_init_one <<===== <rtl8192cd_init_one>LZQ: after read tmpReg[0xbf] =====>>INSIDE rtl8192cd_init_one <<===== =====>>EXIT rtl8192cd_init_one <<===== <rtl8192cd_init_one>LZQ: after read tmpReg[0xbf] =====>>INSIDE rtl8192cd_init_one <<===== =====>>EXIT rtl8192cd_init_one <<===== <rtl8192cd_init_one>LZQ: after read tmpReg[0xbf] =====>>INSIDE rtl8192cd_init_one <<===== =====>>EXIT rtl8192cd_init_one <<===== <rtl8192cd_init_one>LZQ: after read tmpReg[0xbf] Realtek 865x Ethernet driver v0.6 (Mar 26, 2008) eth0: RTL865x-NIC at 0xbb804000, 00:00:00:00:00:11, IRQ 2 eth1: RTL865x-NIC at 0xbb804000, 00:00:00:00:00:22, IRQ 2 => rtl865x_ioctl init NET4: Linux TCP/IP 1.0 for NET4.0 IP Protocols: ICMP, UDP, TCP, IGMP IP: routing cache hash table of 512 buckets, 4Kbytes TCP: Hash tables configured (established 1024 bind 2048) Linux IP multicast router 0.06 plus PIM-SM ==> create_proc_ipclone() form DEV.c ip_conntrack version 2.1 (512 buckets, 1024 max) - 384 bytes per conntrack IPSEC netfilter connection tracking: registered IPSEC netfilter NAT helper: NETDETECT target register ip_nat_bnet: Trying to register for port 6112 FTP proc OK.... ip_ct_ftp: registering helper for port 21 ip_ct_ftp: # of port 1 ip_tables: (C) 2000-2002 Netfilter core team NET4: Unix domain sockets 1.0/SMP for Linux NET4.0. NET4: Ethernet Bridge 008 for NET4.0 VFS: Mounted root (squashfs filesystem) readonly. Freeing unused kernel memory: 60k freed mount /proc file system ok! mount /tmp file system ok! ---> /sbin/init doing alias:n1p version:9.26 Default Configuration Set WAN PORT ================================================================= press magic key to change default setting ... LAN MAC : 90:9F:33:47:AC:D0 WAN MAC : 90:9F:33:47:AC:D1 Bridge Init device wlan0-va0 is not a slave of br0 device wlan0-va1 is not a slave of br0 device wlan0-va2 is not a slave of br0 device wlan0-wds0 is not a slave of br0 device wlan0-wds1 is not a slave of br0 device wlan0-wds2 is not a slave of br0 device wlan0-wds3 is not a slave of br0 device wlan0-vxd is not a slave of br0 device wlan0-va1 is not a slave of br0 device wlan0-va2 is not a slave of br0 device wlan0 is already a member of a bridge; can't enslave it to bridge br0. device wlan0-wds0 is not a slave of br0 device wlan0-wds1 is not a slave of br0 device wlan0-wds2 is not a slave of br0 device wlan0-wds3 is not a slave of br0 device wlan0-vxd is not a slave of br0 device wlan0-va0 is already a member of a bridge; can't enslave it to bridge br0. iptables: No chain/target/match by that name killall: auth: no process killed killall: iapp: no process killed killall: wscd: no process killed iptables: Bad rule (does a matching rule exist in that chain?) killall: iwcontrol: no process killed Only WPA WPA2 WPA-Mixed support for 802.1x Reaped 283 WiFi Simple Config v1.12 (2009.07.31-11:35+0000). Launch iwcontrol: wlan0 Reaped 287 iwcontrol RUN OK Invalid Save : ▒▒▒▒nv SIGNAL -> Config Update signal progress killall: pppoe-relay: no process killed SIGNAL -> WAN ip changed Led Silent Callback Turn ON All LED Dynamic Channel Search for wlan0 is OFF |
□ JTAG 를 이용한 펌웨어 덤프 (동기식)
1. 메모리를 읽어와 펌웨어를 덤프하기 위한작업이며, TCK 를 서로연결해야 통신이 된다.
- 총 5개의 핀을 사용 + GND 1
- 3.5.7.9
2. JTAG 사용을 위해서는 openOCD 프로그램을 설치해야 함
3. 노트북에 연결된 Shikra 장비를 버추얼박스에 인식되도록 장치설정

4. openocd 가 설치된 위치에서 포트를 오픈하여 접속가능 하도록 설정
> openocd -c telnet_port 4444 -f cfg/badge.cfg -f cfg/bcm5352e.cfg

5. 명령창을 추가 오픈하여 오픈된 4444 포트로 접속
> telnet localhost 444

6. targets 명령어로 JTAG으로연결되어 있는 장비확인
> targets

7. 메모리 덤프 명령어를 순차적으로 입력하여 메모리내 펌웨어 정보를 다운로드
> halt > mdb 0x8050000 100

> mdw 0x8050000 100

> dump_image test.bin 0x10000 100

□ JTAG 을 이용한 펌웨어 덤프 (동기식)
1. Bus Prirate v3 SPI + flashrom reading
2. 보드에 부탁된 플래시롬을 확인한다
3. 메모리에 표시된 모델을 기준으로 Data Sheet 를 검색하여 넘버별 기능을 확인(CS, VCC, GND 등)
- 구글검색 > MX25L3206E Data Sheet 검색
- https://www.alldatasheet.com/datasheet-pdf/pdf/934247/MCNIX/MX25L3206E.html
※ 장비간 연결방법
- 전원커넥터 USB <-> 집게 <-> Sikra
- 집게<-> Flashrom 연결 (오목 dot을 기준으로 숫자확인) / 실제 집게에 찝히는 회로를 숫자로 매칭함.
* Shikra와 flashrom(집게연동)간 케이블을 연결하는 방법은 Dataseet와 Shikra SPI 연결 매뉴얼을 참고한다
4. 노트북에 연결된 Shikra 장비를 버추얼박스에 인식되도록 장치설정

5. flashrom 설치 확인

6. flashrom 메모리 연결하기
> flashrom -p ft2232_spi:type=232H
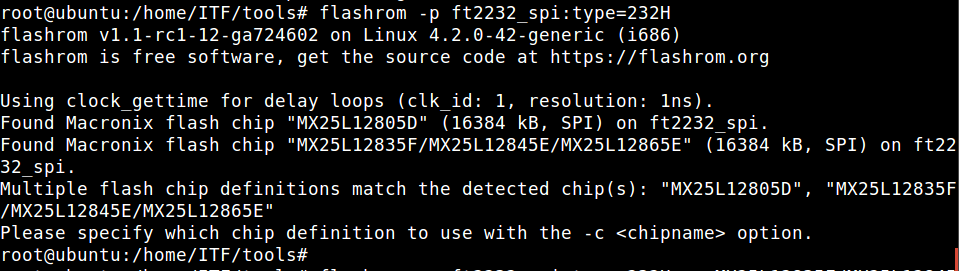
7. 위에서 확인된 제품명을 입력(2개 이상일경우 하나씩 테스트)
> flashrom -p ft2232_spi:type=232H -c MX25L12835F/MX25L12845E/MX25L12865E -r test.bin

8. 덤프된가 완료된 메모리 파일 확인

□ 펌웨어 언패킹 하기
1. 부트로더, 커널이미지, 파일시스템을 분리
2. 펌웨어 파일확인
- binwalk : 펌웨어를 분리하는 솔루션
- Firmware Modification Toolkit : 펌웨어 패킹하는 솔루션
3. 엔트로피 확인
> binwalk -E -B n604s_kr_8_60.bin
4. 펌웨어가 사용하는 아키텍처 확인
> binwalk -A test.bin
5. 펌웨어 압축해제후 추출/검사
> binwalk -eM n604s_kr_8_60.bin
□ 리눅스 암호 압축 파일(zip) 크랙 하기
1. 크랙프로그램 다운로드
> apt install fcrackzip
2. 크랙프로그램 실행
> fcrackzip -u -v -b firmware.zip
| > fcrackzip -u -v -b firmware.zip found file '02.02EU', (size cp/uc 12/ 0, flags 9, chk 9422) found file '2K-cksum.txt', (size cp/uc 462/ 787, flags 9, chk 9423) found file '2K-mdm-image-boot-mdm9625.img', (size cp/uc 3491091/3823616, flags 9, chk 394a) found file '2K-mdm-image-mdm9625.yaffs2', (size cp/uc 9288483/25869888, flags 9, chk 394a) found file '2K-mdm-recovery-image-boot-mdm9625.img', (size cp/uc 3491091/3823616, flags 9, chk 394a) found file '2K-mdm-recovery-image-mdm9625.yaffs2', (size cp/uc 6095084/14733312, flags 9, chk 394a) found file '2K-mdm9625-usr-image.usrfs.yaffs2', (size cp/uc 10226536/27439104, flags 9, chk 9422) found file 'appsboot.mbn', (size cp/uc 38257/ 69872, flags 9, chk 394a) 8 file maximum reached, skipping further files checking pw beTX~~ PASSWORD FOUND!!!!: pw == beUT9Z |
□ 리눅스 hexdump 확인
1. hexdump
> hexdump -C WLR-4004v1003-firmware-v103.bin | tail -n 10
이상. 끝.